Guide:Magic Find Barbarian 1.09, by Flux Part IV
This v1.09 guide describes how to build and play a Magic Find-specced Barbarian who does lots of Mephisto runs.
- Patch: v1.09
- Gametype: PvE/PvM
- Guide Topic: Mephisto
- Class: Barbarian
- Specialisation: Magic Find Barbarian
- Author: Flux
- Pages: One, Two, Three, Four
- Related Article(s): Magic Find [1]
Best Item Runs[edit]
So where best to do your MF'ing? You can kill anywhere with MF and find good stuff, but the main goal of most MF'ing characters is to kill big bosses over and over again, as quickly as possible, to get the most total drops, which will raise the number of good drops.
Does lots of MF guarantee you good drops? It guarantees that you'll get more Sets and Uniques dropping, but not necessarily that they'll be "good" items.
The item type a monster drops is total chance; you can have 1000% MF and do 50 Meph runs and never see a single Shako, or Bramble Mitts, or Balrog Plate, to name a few of the popular Elite Item types that you'd want set or Uniques of. The same is even more true of Pindleskin, for the really hard to find stuff from the highest Treasure Classes. You might do 100 Pindleskin runs and never see a single Hydra Bow drop, in which case all the MF in the world wouldn't get you a Windforce.
The point in MF is to make the desired items types, when they do (by chance) drop, have better odds of being Set or Unique.
Mephisto[edit]
This is the most popular run, and until Pindleskin and Baal runs have become more popular of late, Mephisto was the basis for the D2X economy. He's still by far the best run for fast finding of top items, and he can drop most Elite items, though his odds to do so aren't very good. Check our main MF Guide for full info on what all of the most popular bosses can and can't drop on Hell. The following is copied from that Guide, where it's discussed in more detail and Treasure Classes are explained.
Mephisto Drops
Hell Mephisto can drop none of the following items. (Anything not listed here he can drop.)
Armor
Armor 81: Aegis, Conqueror Crown, Kraken Shell (M'avina's Embrace), Mirrored Boots, Spired Helm (Veil of Steel and Ondal's Almighty), Succubae Skull.
Armor 84: Archon Plate, Bone Visage (Trang's Helm), Lacquered Plate (Tal Rasha's Armor), Sky Spirit, Troll Belt (Trang's Belt), Ward (Heaven's Taeback), Zakarum Shield (The Herald of Zakarum is the unique Gilded Shield, not a Zakarum shield, the names are the same, but there is no other connection. The Herald of Zakarum is exceptional, not elite.)
Armor 87: Bloodlord Skull, Diadem (M'avina's True Sight), Guardian Crown, Myrmidon Greaves, Ogre Gauntlets, Shadow Plate (Aldur's Deception).
Armor 90: Colossus Girdle, Corona (Griswold's Honor), Dream Spirit, Sacred Armor (Immortal King's Soul Cage), Vortex Shield (Griswold's Honor).
Weapons
Weapon 81: Colossal Sword, Cryptic Axe, Ghost Glaive, Matriarchal Pike, Runic Talons, War Spike, Ward Bow, Winged Axe.
Weapon 84: Champion Axe (Messerschmidt's Reaver), Cryptic Sword (Sazabi's Sword), Demon Crossbow, Fanged Knife, Ghost Spear, Great Poleaxe, Legendary Mallet (Schaefer's Hammer), Shillelagh, Vortex Orb.
Weapon 87: Berserker Axe, Colossus Blade (Bul Kathos Sacred Charge and Grandfather), Hydra Bow (Windforce), Scissors Suwayyah (Natalya's Mark), Thunder Maul (Cranium Basher), Unearthed Wand, Winged Harpoon.
Weapon 90: Giant Thresher (Stormspire), Glorious Axe, Legend Spike, Mythical Sword (Bul Kathos Tribal Guardian), War Pike, Archon Staff, Caduceus (Griswold's Redemption), Dimensional Shard.
The highest TC Hell Meph can drop is 78, which includes the following items. These he can drop, but will do so very seldom.
Armor 78: Balrog Skin (Arkaine's Valor, Sazabi's Ghost Liberator), Crusader Gauntlets, Earth Spirit, Hellforged Plate (Naj's Light Plate), and Troll Nest.
Weapon 78: Champion Sword (Doombringer), Conquest Sword, Crusader Bow (Eaglehorn), Feral Claws, Grand Matron Bow (M'avina's Caster), Scourge, Seraph Rod, and Winged Knife.
All monsters in D2 are increasingly likely to drop items as you move down their available Treasure Classes, and very unlikely to drop items from the higher/est TCs they can drop from. So you will very seldom see Mephisto drop anything at all from Armor or Weapon 78, (of any quality) even though it's possible. Any random boss monster in Act 4 or Act 5 Hell has better odds to drop an item from Armor/Weapon 78, but the odds of it being high quality (Set/Unique) would be very poor. [Top]
Mephisto Strategy[edit]
So knowing what he can drop, how to kill him? Once you are experienced with running through Durance 2 and 3, you'll be able to do Meph runs on hell in around 2 minutes, including the time it takes to create the game on Battle.net. When you are learning them and getting faster, it helps to have an actual stop watch set, get your kitchen timer and put it on 10 minutes and try to do five runs in that time. Notice where you are slowing down, if it's in town or you are stopping to fight on Durance 2, or you are taking 90 seconds to kill Meph himself, and work to speed that portion of the run up.
Why so fast? Well, you aren't doing these for the experience, and they aren't really for the fun of it (the fun is in finding items, not killing Meph), you are after the end result. If you enjoy them and like to take your time, then that's fine, but basically you want him dead as quickly as possible. If you have an hour to do runs, you'll obviously find more stuff if you do 30 than if you do 20. Especially if you do that hour twice a day for a week, to average out random lucky or unlucky strings.
Durance of Hate, Level Two[edit]
When you first take the waypoint down, you will want to cast BO to double your hit points. You can do this and drink a potion to fill up again, or waypoint back to Kurast and get a free fill from Ormus. If you have a merc, you should probably Join Game > Durance 2 > BO > waypoint to town > heal at Ormus > sell gear > waypoint down > go go go! If you are doing it alone it's easier to hit Ormus when you first run up to him, ID and sell stuff from the last run, buy some red potions (I like to keep 1 or 2 slots of them, since I drink two every single time.), waypoint down and BO, drink a couple of reds, and take off. They'll fill as you run, and I've never had a problem being less than full bonus BO hit points before the reds filled up. It's faster this way than going back to town every time to Ormus.
You can feed your merc a couple of potions as well, but it takes them two or three to fill up from your BO bonus, and they seem to fill very slowly. Plus that's 4 or 5 full red potions every time, so you need two belt slots for that, and would need to buy more every single game.

The layout of Durance 2 is the biggest component in the speed of your runs. You can usually find the stairs down pretty quickly by going Clockwise around the level.
Basically, put your Barb so his left shoulder is against the outer wall, and keep going that way. You'll find the stairs down before the stairs up around 80% of the time. As you do more Durance 2 runs, you'll recognize various rooms, and know where the exit out of them will be before they are fully on your map.
Sometimes you'll start off going to the right, other times to the left. At first you'll often go the wrong way at times, especially when you are running with a pack of Dolls on your heels, but after a while going the correct direction becomes more or less automatic.
Waypoint bottom, stairs down top.

Waypoint far left, stairs right.

Clockwise, 11 hours later.


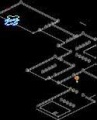
But as said, sometimes there is no clockwise, or the stairs down are in a very odd location. This map here shows one such case, where it appeared while running the stairs would be lower right, then lower left, but those are the stairs up. The actual stairs were very close to the waypoint, and definitely not clockwise.
You often this this same sort of problem when the stairs are near the waypoint, but you have no way to tell where they are unless they are so close you can see the stairs on the map. If it's on the other side of a wall, you can point your cursor and see the hover text on the steps, and sometimes save yourself a long run in the wrong direction.
Whatever the location, you should do Durance 2 in the same fashion every time, at a full out run. With decent speed on your boots, and a point or more in Faster Run, you can keep ahead of anything, and usually zip through trouble spots before you get swarmed. Sometimes you'll get a blocked doorway and need to leap over a monster, or WW through it/them, but most of the time you won't even get hit, or maybe just a couple of times as you pass by some monsters. These maps are somewhat misleading, since they are all longer than average runs. Often the stairs in in the very next room clockwise, and you're down to Durance 3 in 10 seconds or less. [Top]
Durance of Hate, Level Three[edit]
The run through Durance 2 can be dangerous, mostly since you don't know where you are going, or what monsters you'll get on the way. Durance 3 you know the layout, since it's the same every game, but the monster locations vary, and there are very dangerous things on this level.
You should always run for the archway immediately. However you won't be able to pass through it immediately. Often Bremm and company are right in it, or there is a boss pack of dolls or Dark Lords clogging the entrance. Dolls are worse since they are so fast they can scoot into your way and block the archway. It's not safe to WW through it, you could get hit by a Mana Burn and lose the mana to make your Leap Attack to safety over the blood moat, or get an MSLE Bremm and instant death. I don't advise leaping either, it's very easy to get desynched there and go nowhere. Two of the 4 or 5 times I've almost died doing Meph runs were trying to leap over a mob in that doorway. Also Bremm or a Doll pack can run faster than you move in mid air, and they'll totally surround you as soon as you land.
Run out the middle and leap.
If the doorway is blocked it's a good plan to run back into the entrance room, and do a big circle around the pillars, luring your pursuers into the area, so you can loop around them and through the archway.
Once through the archway the easiest way is to run out the central peninsula and leap over the portal to Meph's side. You don't need to target the landing spot very carefully, just click in the general vicinity of it and you'll be off. This isn't like using Teleport, where you sometimes will just stand there if you don't target the landing spot exactly. I've never had my Barb not leap due to bad aim.
Run with your cursor right in front of you, but when you get to the take off spot at the end of the middle peninsula, move it all the way to the top left of the screen, and right click with Leap Attack selected. Be sure you have it ready, and don't hit a warcry or WW or something instead. Check this screenshot for a good look at it.
Sometimes the middle isn't passable.
If the middle is blocked, usually by Bremm and pack, it's not real safe to try and run right through them. They could move and block you and you'd get desynched, or if they were nasty, Fanaticism or Extra Fast or both, they might get in a number of hits on you.
You'll have to run around to the left or right side probably 10% of the time. Bremm never spawns off to the left. He's always in the middle, or more often over to the right, or else right past the archway (you can usually run around him and out the middle in those cases. If Bremm is blocking your way, go to the right, there are never any random monsters there, while to the left there is often a boss pack, or just stray Dark Lords. [Top]
Killing Meph[edit]
This is easy enough, just leap over, WW him to a sliver, switch to your Ali Baba, and kill him. More details?
I like to leap over, and move up to just below the seal on the floor. Wait there for Meph to spot you and come out. If he doesn't come over, (sometimes he'll stand still by the steps and do his wimpy Charged Bolt attack, or somewhat less wimpy Coldball) move back behind the pillars to the left, and he'll advance if you get out of sight. Try not to go over to the right, Wyand will spawn over there and sometimes be in visual range if you get too far over, and walk out. He tends to ruin the run right there.
You can't always help it, he does spawn close enough to where you land sometimes that he'll come over as soon as you move up towards Meph. You can either try to lead him back over to the right and leap across again, try to kill Meph while ignoring Wyand, or abort the run. Wyand is always mana burn, which tends to make WW hard to use, if he's hitting you the whole time you are hitting Meph. He can also have dangerous mods, Fanaticism or Might that can share to Meph (leave if it does) or be MSLE. Generally he's just annoying, and if you don't have Meph nearly dead when he comes into view, you should either lead him back over and ditch him, or abort. The ditching is often hard, since he'll not follow you, or Meph will also, or else Bremm is on the right, and will come after you as you try to ditch Wyand.
So try not to go to the right of the big seal on the floor. If you go to the right you might get Wyand, if you go up to where Meph appears you'll often get annoying Dark Lords dropping Meteors on you the whole fight, and the little walls and stairs can get in the way, slowing you down. If there are baskets in the seal area, kick them so they don't interfere with your WW course.
Once in a very long while, you'll get a boss pack of Dolls up behind Meph. I recommend you abort then, it's too dangerous trying to kill them, or avoid them while killing Meph, and too much trouble to try and lead them around the side and ditch them. I've seen dolls up behind Meph two or three times ever, so it's less than a 1% occurrence. You get a Dark Lord boss or random singles up to the far left quite often, where the gold is on the ground and the sometimes uber-chest is. They don't seem to spawn close enough to see you and come running out though, unless you fight Meph well up the steps. The Dolls spawn closer, and run out to ruin your run every time they are there.
When Meph comes into view, try to lure him to a clear spot, and run up and give him a whack when he's in a nice open area. Often he'll move a few yards once you get point blank range, so by standing still for a Berserk swing or two, he'll stop to hit you, and you can then WW the more or less stationary target.
WW Meph in a clear area! This is very important, and speeds things up a lot. Try not to get him with a chest in the way, a wall, baskets on the floor, pillars, etc. You'll hit less often with your WW as you move around him. You can't move him, so lure him out
If you've not used WW much, you can read a lot of basic tips for using it in our skill description. Basically you want to do circles (more like triangles or squares) around the monster. Meph (like all the Act Bosses) is much wider than a normal monster, so he's easier to get multiple hits on. Just hold down the right click with WW selected, and move the mouse around him in 3 or 4-sided patterns. Since he's moving somewhat as you do it, you can't do exact squares.
The reason you move around targets with WW is that it just works much better. You get hit less often, you hit more often (you seldom hit things as you are moving right over them) and you kill faster. You want to move about 2 or 3 yards per WW. Farther and you'll move out of hitting range, shorter and you don't get enough hits per WW to keep your leech up or do the fastest damage.
Watch Meph's color flashes as you go, you'll see him Green, then Yellow as he takes more damage, then Red as he's approaching death. Red can be hard to see in the dark Durance Two, so be careful you don't kill him with your main weapon and lose out on your 200% or more dual Ali Baba MF. Early on you'll have to stop and check him all the time, but as you do more you get used to how long it takes, and can tell when he's about to go just instinctively. I like to get him to about 10 slivers, then do a Berserk or Two, then several Bashes to get him to just the last sliver, before I switch to my Ali Babas.
If you have a Combat Shrine in effect, pay attention, he'll die a lot faster than normal, and you don't want to kill him with your main weapon, and waste the Ali Baba MF.
Run a few yards away before you switch! This is mandatory, due to a bug where if you get hit as you are switching weapons, you become desynched and can't recover, hit anything, cast a town portal, etc. You can, however, be hit, and die while in this state. This happens with all characters, but most often with the Barb doing his weapon switch at point blank range. If you get desynched like that, you have to leave the game, there is no way to cure it. If your merc kills Meph and he drops something good, you won't even be able to pick it up! What you can do in that situation is to wait five minutes so the game is saved, then exit and rejoin, and go down and get your item.
You can use Berserk or WW to kill him with your Ali Babas. Once you good at slivering Meph, Berserk is faster. Early on I'd screw up my Concentrate hits with the main weapon and have to WW him with Ali Baba a lot, since I got whacked too much standing still with Berserk Ali Baba for 10 seconds. Slivering him (getting his hps down a mere sliver before you switch) is easier if you have a lower damage weapon. This part is hard with a big damage weapon, especially if you don't have a shield, (2H swings are slower and bigger damage) since you'll often kill him trying to get him low, or else need 20 hits with Ali Baba for the kill.
When Meph dies check his loot, grab anything good or valuable enough to be worth selling, and leave the game. You can check the chests on each side and to the rear of the room, but you'll virtually never get anything worth keeping, though gold and possibly charms or jewels aren't that uncommon. Open the chests in dual Ali Baba mode of course, for the bonus MF.
Meph Run Overview[edit]
- Create game, run to Ormus, sell stuff from last game, buy red potions.
- Waypoint to Durance Two.
- Battle Orders, fill red by Ormus or potion.
- Run clockwise around to Durance Three stairs.
- Run through archway, leap over the blood moat.
- TP to town to get merc over with you if you have one.
- Stop near the seal, wait for Meph to come down into open area.
- Hit melee once to stop him, then WW him to a fat sliver.
- Berserk, then Concentrate to a thin sliver
- Run a few yards, switch to Ali Baba, kill him with Berserk or WW, or let Merc kill if you are doing that for the MF.
- Repeat until your Eaglehorn mule is full.
It seems like a lot of steps if you've not done many of them, but once you get the hang of them, two minutes per is not hard to maintain. You can do just the same runs on Nightmare, but you are giving up any chance for Elite Set/Uniques then. [Top]
Pindleskin[edit]
Pindleskin is a much less complicated run than Mephisto, and while it has the potential to be very rewarding, you'll find nothing of use the vast majority of time. Like all Super Uniques, Pindleskin always drops 2 items, and four potions. The items can be scrolls or runes or jewels or charms or gems, they don't have to be something you can equip. Super Uniques have a higher % chance to drop better quality (Rare/Set/Unique) stuff than normal bosses, (see a calc demonstrating that here) but their chance is much worse than Act Bosses, and Act Bosses can drop up to 6 items at a time, not just two.
Pindleskin is found through the red portal Anya opens in Harrogath. You want to be sure you do not finish the Nihlathak quest, or if you do, don't get the Halls of Pain waypoint, or Anya won't open the portal, and your quick runs are ruined. (Waypoint, find stairs, up to Halls 1, find stairs, up to Pindleskin is not a "quick" run.) Nihlathak is the most deadly monster in the game on Hell, and he can kill you from off the screen with one Corpse Explosion.
If you are going to do Pindleskin runs, you want a good level of Find Item. 40% more in that skill is like doing 40% more runs in the same amount of time.
Pindleskin isn't a hard kill, but he can be a pain to get with your weapon switch. Run through the red portal, BO up, drink a potion or two if you feel the need, then run into the temple and WW Pindleskin's mob. He's hard to pick out of the bunch since he's the exact same color, and it's easy to kill him by accident while you are WW'ing the others. A PI Pindleskin is great, since you won't damage him while you are killing his minions, and can then Berserk him when they are all or mostly dead.
Of course it's complicated by his minions getting back up, often more than once. This run takes practice to get Pindleskin low, and kill him with your dual Ali Baba while not being beaten to a pulp by his minions, or getting the weapon switch desynch bug being hit while changing weapons as you stand in the midst of several monsters.
I generally WW the mob until several of them die, then pause a second to try and lock onto Pindleskin. If he's still got a lot of hit points I'll do a couple of more WW passes, then check again. Once he's low I'll Berserk or Bash him a couple of times (he has far fewer hit points than Meph, so don't over do it) then switch to Ali Baba to try and get the killing hit with Berserk. Once Pindleskin dies switch back to your big weapon/shield, and WW a couple more to finish off his minions, then switch back and Hork every corpse in sight quickly. A Horked minion won't get back up, and they can drop good stuff also. Of course your main goal is to Hork Pindleskin. Yes he's Fire Enchanted, and yes you can Hork him anyway. In fact you can Hork all FE bosses, and no, we don't know where the rumor got started that you can't.
If you are using a Merc for the kill for the bonus MF, you'll find it works quite well. The Merc often locks onto Pindleskin early, and mercs can slaughter him solo, much faster than they do Meph. It's easy to be killing other monsters with Berserk and your main weapon when suddenly Pindleskin dies, before you notice he's low and switch to dual Ali Baba.
You want to not have any sort of cold damage when doing Pindleskin, since if you shatter him, no Hork.
Pindleskin can drop any item in the game. Anything, including the Set and Unique version. This is why he's a popular item run, since you can do them very quickly (1 minute or less) and he has great potential, though with just two items dropped per kill, and worse odds for them to be Set or Unique, he can be pretty frustrating.
Remember how items selected to drop work; what type of item you get is totally random. You can do 100 Pindleskin kills and never get a Hydra Bow or Colossus Sword of any kind dropped, and your MF had no effect on that at all. You can't find a Windforce or Grandfather if their item type never drops in the first place. Baal is better odds to get most of the top level Uniques and Sets, but since he takes 8 or 10 minutes to kill for most, and Pindleskin takes 1, you can do the math. [Top]
Eldritch[edit]
If you are familiar with the popular Act Five SuperUnique run, which is really the Javazon's specialty, you might want to try it with a Barbarian. Don't bother, it's not his specialty. He can do Pindleskin pretty well, and Eldritch as well, but you'll not have much fun on Shenk. It turns into a lot of WW'ing around in circles while you slowly kill off the tons of minions. Death Maulers get in the way and have to be Berserked, Shenk wanders around and you get creamed if you try to stop WW'ing to kill him, etc. It's not impossible, but it's slow and annoying, you can't even Hork Shenk (Item Find never works on him, since he doesn't leave a valid corpse), he drops the same quality as Eldritch, and both of them are two TC's below Pindleskin. Check the MF Guide for full info on what every popular monster boss can and can't drop.
If you are going to do Eldritch, he's a fast kill, and his minions are easy enough that you can always leech yourself full on them, saving potion drinking. It's a nice run to start with, so when you go to Pindleskin next you'll already be full of hps with BO, and won't need to pause there to fill up.
Eldritch plays like a much easier Pindleskin. If you don't have any poison damage here you can see which one he is by the color difference, so leave the charm in the stash. Spin around to try to kill off all or most of him minions, while not hitting Eldritch much, if at all. It's easier to whack him to a sliver and then switch off if you don't have his minions in the way. Eldritch is Horkable also, so be sure you do so after the kill. [Top]
Baal[edit]
This is the hardest of the item runs, and takes the longest. My last MF Barb died on a desynch to Lister, but he did quite a few Baal runs before then, and could do them in 5-8 minutes, mostly depending on how quickly I found the stairs down on WS 2 and 3. Expect to be a lot slower your first few tries, but you'll get the hang of it. Whether you want to get the hang of it is debatable, since Baal drops only slightly higher quality stuff than Meph, and takes 3-5x longer to do, on average. And it's very dangerous, a major concern HC.
Baal can be potentially very profitable, and he's not very hard himself, but getting there is a pain. Baal drops up to Armor and Weapon 87, which includes Windforce and Grandfather. The only stuff in Armor/Weapon 90 are odd items you don't really need, but people just like for the near-impossibility of finding it.
Baal can drop everything but these:
Armor 90: Colossus Girdle, Corona (Griswold's Honor), Dream Spirit, Sacred Armor (Immortal King's Soul Cage), Vortex Shield (Griswold's Honor).
Weapon 90: Giant Thresher (Stormspire), Glorious Axe, Legend Spike, Mythical Sword (Bul Kathos Tribal Guardian), War Pike, Archon Staff, Caduceus (Griswold's Redemption), Dimensional Shard
To do a successful Baal run you should pop to WS2 waypoint, and move through WS2 and 3 as quickly as possible. Run straight through if you can, (with your shield equipped) and it's not hard to do that on WS3, though on 2 you might have to be more careful of the exploding guys. There's no strategy for finding the stairs down on either level, so just pick a direction and hope.
You'll need to change equipment to kill his minions quickly, though you can do it with a shield still equipped, it'll just be slower. If you change armor, go for something with good defensive properties, like Shaftstop, Lionheart, etc. Same with your helm. Vampire Gaze, Arreat's, Tal's helm, etc, you need to add resistance if you can. If you are using a Stealskull already, it should be good enough. Switch to Laying of Hands, these set gloves are devastating on four of the minions, all demons. Achmel is not, and for him it helps a lot to have an Antidote Potion, to drink after the fight, or you'll probably need to go to town to get cured of the massive poison he breathes.
Adding resistance is important, especially to lightning. Four of Baal's five minions can be MSLE on Hell. A Barbarian with good damage and life leech can WW MSLE monsters with impunity, as long as they don't have Conviction or something at the same time, but it's scary and somewhat painful. Always be ready on that purple potion.
One useful tip for the minions, lure the last three sets back towards the entrance to Baal's final room. You'll be out of the range of Baal's Decrepify curse, but also you can Hork all of the bodies after the fight, after you switch into your MF gear for Baal. The Minion bosses drop like champions, so they are unlikely to kick out anything more useful than a big stack of gold, but it's possible. (This doesn't work on the Fallen and Greater Mummies, since they don't follow you out of Baal's range.)
Also, you don't need to kill the last three groups (if they have really nasty mods, for instance), you can just lure them out of Baal's sight range and ditch them somewhere, and Baal will start laughing and summon up the next batch.
Baal himself is just like a slightly more annoying Mephisto. Run up to him, WW him to a sliver, Concentrate or Berzerk a few times, then Ali Baba for the kill. He's your best kill to find items in the 81, 84, 87 TCs, things that Meph can't drop, so good luck. His cold wedge is pretty nasty, especially if you are in dual Ali Baba mode, so you'll often want to WW him for the kill, since Berserk while chilled is very slow. Baal can do some big damage with his close range drill mana drain attack, especially if he dupes, so try to kill him quickly. [Top]
Moo Moo Farm[edit]
The Cow Level is not a real good place for you to kill in, but if you do it in a party, it's a great place to Hork. There are just about infinite corpses, and if you have a decent level of Hork, you can spend the 5 or 10 minutes steadily rooting corpses, while getting very good party exp (leeching). Cows don't have very good odds to drop anything useful, especially normal ones, but they can drop the same items as Baal, up to TC 87. Charms, Jewels, and Runes are common finds here.
You'll need to either pick up and drink blue potions, or find some living cows to WW from time to time to keep up your mana, since Find Item is 7 per use, and you'll be using it constantly. Be sure you cast BO and Battle Command regularly, to keep your hps and mana pool larger, and also for the +1 to Hork from Battle Command.
If you are doing the level with a friend, ideally a Javazon or Nova Sorc, you can follow her around and help pick up stuff and Hork where she is, and also pick off strays. These help her not waste time or javs on single cows, and let you refill on mana/hps at the same time. If the Javazon has good MF/GF, it can be a very profitable run for both of you, both on exp and loot.
Other Item Runs[edit]
There aren't really any other good item runs.
Meph, Baal, and Pindleskin are the big ones. There are various other monsters in the game that can drop good stuff, of course, but they aren't located where you can easily run right to them every time. Meph, Baal, Pindle are the best combination of big drops and easy access.
All Super Uniques that leave a corpse are great kills for the Barb, since you get to Hork them and possibly get a double drop. You should hork all normal bosses you kill also, just in case. It only takes a second, after all.
Nihlathak can drop as high level stuff as Baal, but he only drops a couple of items, and the odds that they'll be high quality items are lower than when SuperUniques drop them. He's also very dangerous, and not at all recommended for a HC character to take on. He can't be Horked.
Hephasto can drop some nice stuff, with the same odds of it being high quality as when Nihlathak drops it, and Hep is much easier in D2X than D2. He's much too difficult to reach to be a decent item run, and he can't be Horked either.
There are various other SuperUniques in Act 5 that can drop tons of stuff, but none that can be reached that quickly. Thresh Socket is a potential run (he's a Siege Beast found in the Frigid Highlands, always in the first fortified area) since he can drop like Pindleskin and be Horked. Snapchip Shatter can drop just the same, he's found in the ice dungeon below the Ancient's Way, but he is a Frozen Horror, so always shatters upon death, leaving no corpse to Hork. [Top]
Conclusion and Thanks[edit]
The MF Barb is the best item-finding character for Hardcore, since he's much more durable than a Sorceress. He's excellent for Standard also, and the build is about the same for both, though non-HC would probably go with a bit more Str/Dex, and less worry about maximizing hit points. Find Item is an incredibly valuable skill, once you've been using it for a while with Slvl 8 or more in it, you'll wonder how you ever played without it. I've horked up LoH, a Harlequin Crest, a Goldstrike, many Runes up to Um, and dozens of good Exceptional Uniques and Sets. And those are all free items, ones that no other character could have gotten there, taken from monsters that were already dead. It seems like such a scam!
Thanks to the D2X team for changing Act Bosses to drop huge every time, making this sort of repetitive, cheesy, anti-social, money-grubbing, join-the-dark-side playing style so damn profitable than decent players can't resist it.
Thanks to the following readers for various comments on this guide, often resulting in additions here or there. Pat, Mike, Steven, Seth, Abracadavor, Petrov, and Rob.
[edit]
This very long guide is spread over 3 pages.