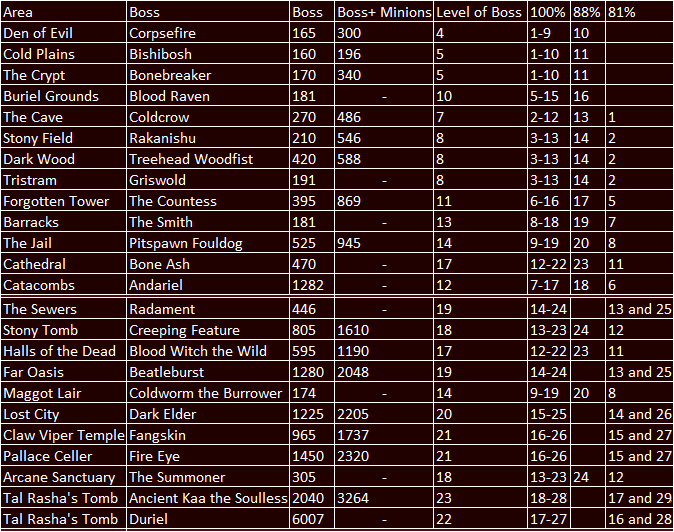
This chart is designed to show where the best experience can be gained. The limitations of this chart are how fast you can kill monsters, amount of monsters in a level, and random bosses.
Some symboles will be use in the charts.
- * means there is some thing in that area that skews the value on the chart.
- ~ means a value has been rounded
Contents
Act One Normal
- BMoor= Blood Moor
- DoE= Den of Evil
- CP= Cold Plains
- BG= Buriel Grounds
- C/M= The Crypt/Mausoleum
- SF = Stoney Field
- Trist= Tristram
- Skewed data because of the many random bosses in the area.
- UGP= Underground Passage
- DW= Dark Woods
- BM= Black Marsh
- Skewed data because of the blood hawk nests.
- Hole= The Hole
- FT= Forgotten Tower
- Skewed data because of the many random bosses in the area.
- TH/MG= Tamoe Highland/Monistary Gate
- Pit= The Pit
- OC= Outer Cloister
- B= Barracks
- Jail= Jail
- C/IC= Cathedral/Inner Cloiser
- Cata= Catacombs
Act Two Normal
- Sewer= Sewers
- RockW= Rockey Waste
- STomb= Stoney Tomb
- DHill= Dry Hills
- HotD= Halls of the Dead
- Oasis= Far Oasis
- Mag L= Maggot Lair
- LostC= Lost City
- AnTun= Ancient Tunnels
- ClawT= Claw Viper Temple
- Harem=Harem
- Pcellr= Palace Celler
- Arcan= Arcane Sanctuary
- CotM= Canyon of the Magi
- Tombs= Tal Rasha's Tombs
Act Three Normal
- Spi F= Spider Forest
- Spi C= Spider Cavern
- Arach= Arachnid Lair
- Marsh= Great Marsh
- FlayJ= Flayer Jungle
- SwPit= Swampy Pit
- FlayD= Flayer Dungeon
- Lower= Lower Kurast
- Baazr= Kurast Baazar
- Upper= Upper Kurast
- Causa= Kurast Causaway
- Trav= Trancival
- Duran= Durance of Hate
Act 4 Normal
- Ostep= Outer Steppes
- Plains= Plains of Dispair
- CotD= City of the Damned
- River= River of Flame
- Chaos= Chaos Sanctuary


