Quests Act I (Diablo II)
The Quests in Act One introduce the game plot and provide the player with some decent rewards for their trouble.
Contents
The Sightless Eye[edit]
The main quest in Act I is to find Andariel, in her throne room deep under the Rogues' Monastery, and defeat her and her army of minions. This is the only mandatory quest in order to advance the game, as you must kill her to clear the pass and advance on to Act II with Warriv's caravan.
Act I: Den of Evil[edit]
- Quest Name: Den of Evil
- Act: Act I
- Triggered By: Starting Act I
- Given by: Akara the Healer
- Location: Den of Evil (Blood Moor)
- Reward: One skill point and one respec from Akara
- Quest Priority: Not a mandatory quest, but you'll always want to do it since it's got a great reward, and is very easy.
Kashya's rogue scouts have found a nearby cave filled with shadowy creatures and horrors from beyond the grave. Akara fears that these creatures are massing for an attack against the encampment. Destroy all of the monsters in the Den of Evil including any Champions or Unique monsters.
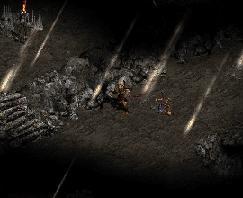
This is an easy quest, you need merely kill all the monsters in the den. There are usually around 50 of them, depending on the random spawn and size of the Den. When you get down to five left the Quest Button will pop up telling you that, and the display in the Quest Window will count down the remaining kills.
Tips[edit]
The only potentially tricky part is if you miss a monster, often a Fallen Warrior that will run when you kill something else and get lost in a corner. Clear the Den systematically; be sure you've gotten everything in one area before you move on, especially running Fallen, and you won't have to waste time hunting all over the place for that one last monster.
Trivia[edit]
There's a cute Easter Egg in the Den; if there are fewer than five monsters remaining (few enough for the quest prompt to pop up) and a Fallen Shaman resurrects enough Fallen to increase the number above 5, the quest window will display, "Monsters remaining: 666."
On a side-note, if you already have completed the quest, the level is instead named just "Cave" rather than "the Den of Evil".
Act I: Sisters' Burial Grounds[edit]
- Quest Name: Sisters' Burial Grounds
- Act: Act I
- Triggered By: Entering the Cold Plains
- Given by: Kashya the Rogue Leader
- Location: Burial Grounds off the Cold Plains
- Reward: One free Rogue mercenary from Kashya and option to hire more of them.
- Quest Priority: Not mandatory, and most characters skip it.

Kashya's Rogue scouts have reported an abomination in the Monastery graveyard. Blood Raven, one of the Rogue's finest captains in the battle against Diablo at Tristram, has been corrupted by Andariel. She can be found in the Monastery graveyard raising the Rogue's dead as zombies. You must help the Rogues destroy her.
You must find the Burial Grounds and kill Blood Raven, an evil corrupted Rogue, to complete this quest. To reach the Cemetery you need only follow the dirt path through the Cold Plains. It will fork twice, one path leads to the Stony Field (where you need to go to advance through the act), another leads to The Cave dungeon level, and the other leads to the Cemetery. You have to just follow them and see where they go, and if you pick the wrong fork backtrack and follow the path onwards. It's not a very large area, so you can just run around the perimeter if you don't want to follow the paths; you'll get there eventually.
The Cemetery is full of skeletons and zombies, as you'd expect, and you can kill them for experience or just go right for Blood Raven. She is an archer, as befits a rogue, and very fleet of foot. She is fond of dashing around the cemetery and stopping to shoot arrows when her pursuers get hung up on the hordes of undead. Blood Raven can also raise more zombies while within the graveyard. When she dies there is a fantastic bit of eye candy, with streaks of lightning pouring out of her levitating body. These will kill off any Undead in the area.
Once you kill her when you next return to town Kashya will be eager to talk, and when you do she'll give a speech about the death of Blood Raven, and you get a free Rogue mercenary. You don't get to pick your own, you are assigned one randomly, but once you finish this quest you can hire more at any time. It is not required to complete this quest to hire rogue mercenaries, as you get that option anyway once you are past Clvl 8.
Tips[edit]
Blood Raven is pretty nasty, she does a lot more damage than anything you've faced in the game up to that point, or will face in the next few areas. Low hit point characters should be prepared to drink a lot of potions, and she's very fast, so expect to chase her around quite a bit as well. She continually raises zombies up from the cemetery earth, and these are normal monsters, you can kill them for full experience and item drops, and it's usually a good idea to kill a bunch of them before you go after Blood Raven, or you'll be running through crowds after her and taking cheap hits from them.
In the Cemetery there is a Crypt and a Mausoleum that each lead to a small dungeon with a golden chest, if you want to level up some more before you take on Blood Raven.
Trivia[edit]
In the game plot, Blood Raven is meant to be the Rogue character from Diablo I. She returned to the Monastery after her adventures beneath Tristram, troubled by the experience, and was eventually corrupted by Andariel. Several of the NPCs make this point in their dialogues and gossips about the quest, and Kashya states is clearly in the quest introduction:
- My Rogue scouts have just reported an abomination in the Monastery graveyard! Apparently, Andariel is not content to take only our living. Blood Raven, one of our finest captains in the battle against Diablo at Tristram, was also one of the first to be corrupted by Andariel. Now, you'll find her in the Monastery graveyard raising our dead as zombies! We cannot abide this defilement! If you are truly our ally, you will help us destroy her.
Act I: The Search for Cain[edit]
- Quest Name: Rescue Cain
- Act: Act I
- Triggered By: Reaching the Dark Wood
- Given by: Akara
- Location: Tristram, reached via the Stony Field
- Reward: Free item identification from Deckard Cain and a ring from Akara. Ring Ilvl: Normal 7 (magical ring), Nightmare 28 (Rare Ring), Hell 49 (Rare Ring). The ring's Ilvls are preset, it doesn't matter what your Clvl is when you do this quest or get the reward.
- Quest Priority: This is not a mandatory quest, but it's useful to get free ID's from Cain and the ring reward.
Akara informs you that you are facing an evil difficult to comprehend and there is one Horadrim Sage, schooled in the most arcane history and lore who could help known as Deckard Cain. You must travel to Tristram to find him. To begin your quest the people of the Rogue Encampment tell you to find bark from the Tree of Inifuss which holds mystical runes. Take the bark to Akara. Once she has translated it she tells that you find the Cairn Stones and touch them in the order written.
Finding and rescuing Cain is the most complicated quest in Act One. You must:
- Travel from the Stony Field through the Underground Passageway to the Dark Wood.
- Find the Tree of Inifuss and click on it to get the Scroll of Inifuss.
- Take the Scroll of Inifuss to Akara where she will translate it.
- Take the translated Scroll to the Stony Field and click on the five stones in the correct sequence. (Or just click on them all randomly as they light up one by one.)
- Go through the red portal that opens up in the middle of the stones to Tristram.
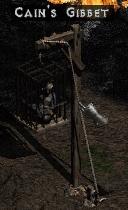
- Find Cain in his cage in Tristram and free him by clicking on it.
- Return to the Rogue Encampment for your reward(s).
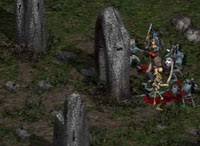
There are a lot of monsters to kill along the way, and some very cool stuff in the burned out Tristram, including a couple of the old Diablo I NPCs who are rather changed by now, including Griswold. It's well worth exploring, and you need to get Wirt's Leg for the special seventh quest of Act I, though you can come back and get it later.
Tips[edit]
Find the Waypoint in the Dark Woods before you return to town with the Scroll of Inifuss. This will save you a long walk back from the Stony Field through the Underground Passageway to the Dark Woods after you rescue Deckard Cain.
Note: If you do not rescue Deckard Cain before continuing to Act II, it will be considered a failed quest until a new game has been made. In this case, Deckard Cain will tell you that he was rescued by the Rogues, and you will have to pay 100 gold per item to have them identified by him. This is the only quest in Diablo II that can be failed.
In multiplayer games created by characters who have already rescued Cain or moved to Act Two, Cain will be in town for even brand new characters, the Rescue Cain quest will be unavailable, and he will charge them to identify items. A character who has not yet rescued Cain must create their own game to do so, or join a game created by someone who has not yet completed that quest or moved on to Act Two.
Act I: The Forgotten Tower[edit]
- Quest Name: The Forgotten Tower
- Triggered By: Reading the Moldy Tome, found in the Stony Field
- Location: Find the Forgotten Tower ruins in the Black Marsh
- Reward: Killing the Countess on the fifth level of the tower releases dozens of stacks of gold and numerous items from the magical chest.
- Quest Priority: This is not a mandatory quest, and most characters skip it. It became more popular with v1.08, as the Countess began to drop a Rune nearly every time.

The Moldy Tome recounts a story of a Countess who was buried alive. The castle in which so many cruel deeds took place fell rapidly to ruin. Rising over the buried dungeons, a solitary tower is all that remains. The Countess's fortune was said to be divided among the clergy, although some say that more remains unfound, still buried in the tower.
The trigger, reading the Moldy Tome, is not required for this quest. You can just find the ruins of the tower in the Black Marsh, and descend into it. It's a very nasty area, one of the hardest in Act I, with small rooms and numerous boss and champion monster packs. The levels are very small though, and on the fifth and lowest level there are two rooms with dozens of stacks of gold in each, and several chests. The end of the fifth level has a room with a glowing golden chest guarded by The Countess, a melee-fighting Corrupt Rogue.
You must kill her to finish the quest. When she dies she expires in a cloud of smoke, and then the golden chest opens and erupts showers of gold, potions, and items, literally dozens of them spouting out one at a time. It's fun to try and pick up the goodies as quickly as they fall. There are seldom any valuable items, just magical stuff and a Rune of varying value, but it's nice gold for a new character.
Tips[edit]
Beware the tower, the tiny rooms and small levels leave you no room to retreat, other than up the stairs, and there are tons of boss packs, mostly of Goatmen and Specters. Often when you come down to the next level you'll find monsters very near the stairs, so be ready.
Prior to v1.08, the Countess would stay in the last room until you entered it, but her minions would wander around and come outside the room, and you could pick them off one by one. She no longer stays inside, but rushes out as soon as you are in the area, making this quest harder.
Since v1.09 the Countess has begun dropping a rune almost every time she is killed. Her rune drops were improved further in v1.10, and as a result she's now one of the most popular "item run" monsters in the game, especially for players who are Rune Hunting.
Trivia[edit]
The quest is not explicitly unconnected to the other events in the The Sightless Eye chapter. However, Akara has hinted that some of her Rogues explored the tower but never returned, so it may be presumed that the Countess (a Corrupt Rogue) may have counted many Sisters of the Sightless Eye among her numerous victims.
The Quest is likely inspired by the real-life Elizabeth Báthory, who was also known as "Blood Countess" and as "Bloody Lady of Čachtice". She was accused of torturing and killing hundreds of girls and young women, and supposedly bathed in the blood of virgins in order to retain her youth.
Act I: Tools of the Trade[edit]
- Quest Name: Tools of the Trade
- Act: Act I
- Triggered By: Reaching the Monastery Gates
- Given by: Charsi the Blacksmith
- Location: The Smith's room in the Barracks
- Reward: Charsi will imbue an item for you. This means take any normal item and make it into a Rare with random stats, based on your Clvl.
- Quest Priority: Not a mandatory quest, but the reward is valuable.
When Charsi fled the Monastery she left behind her Horadric Malus, an enchanted smithing hammer. If you can retrieve it for her, she will use its magic to strengthen your weapons. The Malus is guarded by the Smith.
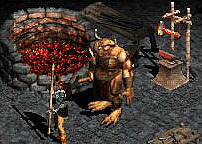
When you get near the Barracks, Charsi will be activated to ask you to retrieve a smithing hammer she had to leave in the Monastery when they fled the sudden invasion of demons lead by Andariel. You need to find the inner room (in a random location each game) of the Barracks level (first level inside the Monastery) with the forge and the hammer on a stand. Note, the player character must be at least level 8 on all difficulties in order to interact with the stand, acquire the Malus and complete the quest. It is guarded by the Smith, a large boss monster reminiscent of the Butcher from Diablo I. He will pursue you at a high rate of speed and is a pretty nasty fight. He hits very hard and has a lot of hit points. You however do not need to kill him, you can just dodge around him and grab it from the stand. Once you return to town and click on Charsi she'll claim the hammer, even if you have it in your stash.
Tip[edit]
The Smith can't open doors, so if you are a ranged attacker and can't take him toe to toe (which is pretty likely unless you have extremely good equipment for your level) you can lead him through the Barracks to one of the barred walls or corners, such as the one around the steps leading down, and close the door. He'll pace on the other side of it, but won't open the door, giving you free shots.
Reward[edit]
The Imbue Quest is a very valued one, more so in D2 than D2X, where Rare items aren't as big a deal. This one should be executed at specific levels, depending on which type of item you are going to Imbue, and what you want on it. Read the Imbuing Guide for more details.
Act I: Sisters to the Slaughter[edit]
- Quest Name: Sisters to the Slaughter
- Act: Act I
- Triggered By: Finishing the Malus Quest, or by reaching Catacombs level three
- Given by: Cain the Elder
- Location: Andariel's Throne Room, Catacombs level four
- Reward: You may travel with Warriv's caravan to Lut Gholein and Act II.
- Quest Priority: Mandatory, you must kill Andariel to advance to Act II.

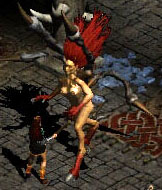
Andariel is the Quest boss of Act I, and the hardest monster to defeat in the Act. She is in a large inner room at the bottom of the Catacombs, on level four. You enter in a long room that usually has a few zombies in it, then enter a larger room with a blood lake and tons of Dark Ones, the black type of Fallen. Once you clear that room you face a large set of double doors, and within Andariel awaits.
It's time to face the demon queen Andariel, who has corrupted the Rogue Sisterhood and defiled their ancient Monastery. You must kill her before the Monastery becomes a permanent outpost of hell and the way east lost forever.
Prior to v1.08 she would usually rush right out once you opened the doors, but now she is found well back in the room, which gives you a chance to clear out the monsters near the door before you encounter her. Andariel's main attack is her poisonous sting and the poisonous cloud she spews out in a half circle. This poison will drain your hit points at a terrible rate if you don't have poison resistance and/or lowers poison resistance equipment. Stocking up on some antidote potions before this battle is never a bad idea.
Once you defeat her, she immolates in a huge pillar of fire, the screen shakes, rocks fall, the floor is torn up, and after a few seconds a portal opens up back to town. Andariel drops a random assortment of magical items, usually two of them, along with two chipped gems and one normal one, the first of that quality you see in the game. Her drops are improved in v1.08, like all of the Act Bosses, so you may get multiple blue items and even some Rare or Unique or Set items now.
Tips[edit]
Use the blood lake in the second room to run in circles around if you can't go toe to toe with Andariel, a common problem for ranged attacking characters early on. Poison antidote potions are very useful, as are items that cut poison duration. You should find some in Act One, save them to wear for Andariel.
Secret Cow Level[edit]
The Secret Cow Level is not one of the six quests of act one, but it can only be accessed through the Rogue Encampment. To open a red portal to the Secret Cow Level you must transmute a Tome of Town Portal with Wirt's Leg. This can only be done after your character has received credit for completing that difficulty level (killing Diablo in the classic game, and Baal in LoD).
- See the Secret Cow Level page for full details.
| Quests of Diablo II - Quest Items [e] | |||||
|---|---|---|---|---|---|
| Diablo II | Lord of Destruction | ||||
|
Act I |
Act II |
Act III |
Act V |
Special | |


